PART ONE: Creating the Survey in LifeJourney

Create your questions
- To get started, log in to your LifeJourney account at https://life.territorium.com/#/login
- Select Assessments > Questions from the menu items.
- To create a new question, select Create.


- Enter the Question name. Each question should have a unique question name. It is recommended that a consistent/standard naming convention be used for question names such that the resulting question bank over time can be easily searched and sorted according to form and test development needs.
- If the respondent has a limited amount of time to answer the question, enter the Duration time. Duration must be more than 1 second or the question will not be on the screen long enough to answer - best practice is to choose 1 minute for each simple question.
- The choices for Question type are single choice, multiple choice, dropdown, fill in the blank, open response, conditional, matching, and matrix.
- Response Required indicates a specific question must be answered by the test taker to proceed to the next question.
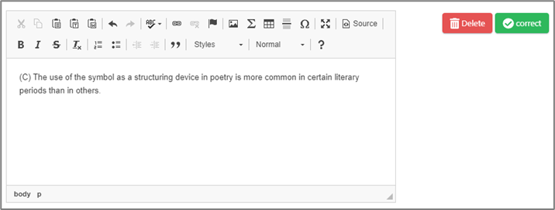
- The Question text can be typed directly into the editor, or copied from a Word document. There are several edit options available, see table at the end.
- The Answer text can be typed directly into the editor, or copied from a Word document. The same edit options are available. For each possible answer to the question, click on the + Answer below the question editor. Each answer is entered in a separate editor window.
-
- For each correct answer, select the Corr
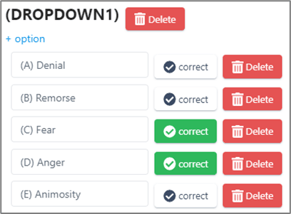 ect button to the right of the editor.
 - Based on the scoring type, multiple correct answers may be selected.
- Repeat inserting answers until all have been added.
- For each correct answer, select the Corr
- After all the information is completely entered for the question, select Create.
- NOTE: HTML source code view is available from the Text Editor.
- Once the question is created, it can be viewed, edited, copied, or deleted.

-
- View– displays the question detail.
- Edit – details of a question can be edited up until the question is added to a form.
- Copy – clicking the copy button will create a copy of the original question with the same name followed by “COPY”. A best practice is to provide a unique name for each question. It is recommended that a consistent/standard naming convention be used for questions.
- Delete – Only questions not currently attached to a form or an active administration can be deleted.
- Preview - displays the question as the Learner would see it.
- Continue until all questions and answers have been created.
Forms
Forms are created from a series of questions.
- Select Assessments > Forms from the menu items.
- To create a new form, select, Create.
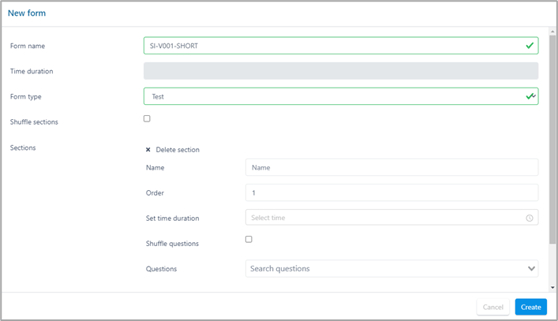
- Time duration is grayed out and will be dynamically adjusted based on the time assigned to each section, which is derived from the time assigned to each question added to the section.
- Mark Shuffle sections if there are multiple sections and they should be shuffled over the course of the administration.
- Mark Show calculator if use of the calculator is allowed for completing the assessment.
- Individual Sections can be configured separately but the form MUST have at least one section to contain questions.
- Enter a unique Name for the section. For example, if collecting information about different aspects of someone's collegiate experience, one section could be about course work, another campus activities, resources used, etc.
- The Order will reflect where the section is placed within the form.
- Sections can have different times assigned, enter the appropriate time for a section in Set time duration.
- If the questions should be shuffled each time the form is administered, mark Shuffle questions.
- To select the Questions, start typing the question name in the search questions field.
- Continue adding questions until the section is complete.
- Additional sections can be created by selecting + new section.
- When all sections have been added, select Create.
- Once the form is created, there are several actions available.

-
- View– displays the form detail.
- Edit – details of a form can be edited up until the form is added to a Test.
- Copy – clicking the copy button will create a copy with the same name followed by “COPY”. A best practice is to provide a unique name for each form.
- Delete – Only forms not currently attached to a Test or an active administration can be deleted.
- Preview - displays the form listing each question and indicating correct responses, allowing user to click through each question for review.
- Preview Detail - vertical display of all the questions and answer choices with correct responses indicated.
PART TWO: Adding the Survey to your Administration

Configuration options are available for each Administration either when you are creating a new one or editing an existing administration.
- Custom Survey tool gives you the option to include customized questions as part of the test administration. Selecting Survey will prompt for selection of a survey form (comprised of one or more questions combined) created using the questions and forms tools described above. Be sure to name your form something that you will recognize when you open the dropdown to select the survey to add.
Surveys will be presented to the Learners at the beginning of the test before the test timer and questions are started - remember that you have the option when creating your questions to make them required or not. If they are not required, learners can skip the answers and submit empty surveys before their exam begins.
PART THREE: Combining your Survey and Exam data
Once you have survey data, you will need to run an Advanced report to merge it with your test taker exam data. To access the advanced Assessment Reports, select Reporting> Assessment Reports.

Test & Survey Data Consolidation
To get a consolidated file of test and all (your custom questions and standard ETS statistical questions) survey data choose the Test and Survey Data Consolidation report. First, enter the administration name, select the test name OR filter for active administrations to get a list of matching options to combine. Select the administrations you would like to include. Report can be based on single or multiple administrations.

After you click on "Combine Selected," you can choose to return to the Reports tab or navigate to the Executed Reports tab.

In the Executed Reports tab, you will see a Status indicator that shows whether the report is Done or Running. Once the report finishes processing, the Download button will appear in blue, signaling that the report is ready for you to view.
