Assessment Engine
The assessment engine of EdTest.ai provides the ability to develop localized question banks and multiple forms, and offers extensive question, form and assessment configurations including equated form rotation to meet institution, program, and personalized assessment needs.
Key Terms
|
Term |
Definition |
|
Administration |
A testing period defined by a start date and time and an end date and time in which a standardized test is administered using a predetermined set of guidelines or procedures ensuring that all test-takers (Learners in a cohort) are given an equal opportunity to perform to the best of their abilities and to reduce the potential for bias or unfair advantages. |
|
Cohort |
Refers to a group of individuals who take a standardized test under similar conditions, using the same test materials and procedures. Typically, the cohort will be comprised of individuals who are similar in some way, such as being in the same grade level, subject area, or program of study; cohorts are organized through a Learning Experience. |
|
Correct Answers |
Each question can have one or multiple answers. |
|
Form |
An organized series of one or more questions, forms can also contain multiple sections of one or more questions. |
|
Learning Experience |
The method for creating and managing a cohort of test-takers. |
|
Passage |
Portion or section of a written work (a paragraph, verse, etc.) that can be entered once and used across multiple questions. |
|
Question Objective |
[Options: Test or Survey] Determines how the question is considered in test assembly and test results processing. |
|
Question Type |
[Options: Single Choice, Multiple Choice, Dropdown, Fill-in-the-blank, Open Response, Conditional, Matching, Attach evidence] Determines the type of question and the respective answer options. |
|
Question Value Score |
Value applied to each correct answer. |
|
Score Type |
[Options: Exact Match or Per Points] Method for assigning score to each correct answer. |
|
Section |
A grouping of questions. |
|
Survey |
A group of survey questions that when answered are not included in the scoring of a Test. |
|
Tags |
Labels applied to questions that represent categories or content areas that are used for question scoring, form scoring, subscoring and total scores; may also be used for aggregation to support other reporting needs. |
|
Test |
Final product administered to test-takers (Learners). |
Test Structure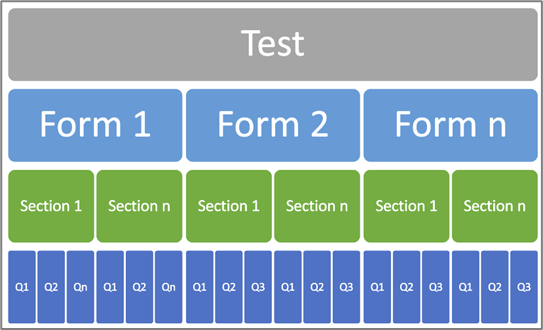
Understanding the test design and purpose.
Tests Assembly: Test are assembled from one or more forms.
Form Assembly: Forms are assembled from one or more sections.
Sections are assembled to include one or more questions.
The Test Author determines the design for the Test including forms, sections, section sequence, time duration for the section, question sequence, question type, etc. Creating and using a test template will help with the test authoring process.
Passage
Passages can be entered directly as part of the question prompt, or if a passage is across multiple questions, it can be created separately.
- Select Assessments > Passages from the menu items.
- To create a new passage, select Create.
- Enter the Passage name. The passage name will be referenced when building the question. It is recommended that a consistent/standard naming convention be used for the passage name.

- Passages can be typed directly into the passage editor or copied from a Word document. There are several edit options available, see table at the end.
- After all the information is completely entered for the passage, select Create.
- Once the passage is created, there are two actions available, info/edit or copy.

- Info/edit – displays the passage name and content. Select the Edit button to begin editing.
- Copy – clicking the copy button will create a copy of the original passage with the same name followed by “COPY”. Best practice is to provide a unique name for each passage.
Questions
Questions themselves have unique characteristics that are important to the overall design, scoring and reporting of the test. EdTest.ai provides the ability to create question banks in that questions can be used in 1 or more forms and tests.
- Select Assessments > Questions from the menu items.
- To create a new question, select Create.
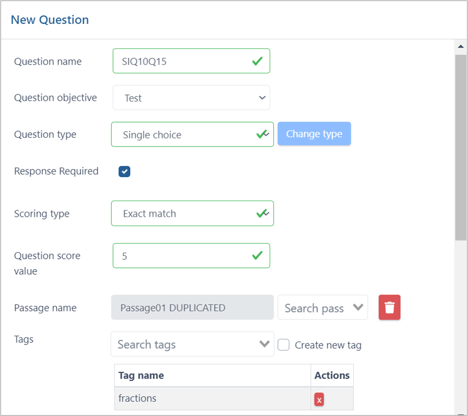
- Enter the Question name. Each question should have a unique question name. It is recommended that a consistent/standard naming convention be used for question names such that the resulting question bank over time can be easily searched and sorted according to form and test development needs.
- Depending on the intent of use of the question, select either “Test” or “Survey” for Question objective. Test is used for any questions that are included in the official test, while Survey is used for the pre or post optional surveys to collect additional information from Learners such as expanded demographic data.
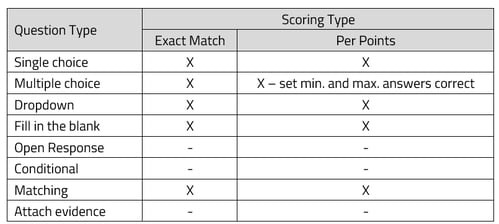
- The choices for Question type are: Single choice, Multiple choice, Dropdown, Fill in the blank, Open response, Conditional, Matching, Attach evidence, and two scoring options: exact match and per points. The following table indicates the possible Question Type and Scoring Type combinations. Selecting Exact Match also requires a Question score value to be assigned. See the end of this article for examples of the different types of questions.
- Response Required indicates a specific question must be answered by the test taker in order to proceed to the next question.
- To add a passage to the question, start typing in the Passage name in the search passage field. To select a different passage either click clear passage or start typing the new name in the search passage field.
- Tags are used to group questions and can be used for reporting but primarily used for scoring the number of correct answers per tag. The type of scores desired will depend on how tags are created and assigned.
- The Question text can be typed directly into the editor, or copied from a Word document. There are several edit options available, see table at the end.
- The Answer text can be type directly into the editor, or copied from a Word document. Same edit options are available. For each possible answer to the question, click on the + Answer below the question editor. Each answer is entered in a separate editor window.

- For each correct answer, select the Corr
 ect button to the right of the editor.
 - Based on the scoring type, multiple correct answers may be selected.
- Repeat inserting answers until all have been added.
- For each correct answer, select the Corr
- After all the information is completely entered for the question, select Create.
- NOTE: HTML source code view is available from the Text Editor.
- Once the question is created, it can be viewed, edited, copied, or deleted.

- Info– displays the question detail.
- Edit – details of a question can be edited up until the question is added to a form.
- Copy – clicking the copy button will create a copy of the original question with the same name followed by “COPY”. Best practice is to provide a unique name for each question. It is recommended that a consistent/standard naming convention be used for questions.
- Delete – only questions not currently attached to a form or an active administration can be deleted.
- Preview - ability to view the question as the test taker would.
Forms
Forms are created from a series of questions.
- Select Assessments > Forms from the menu items.
- To create a new form, select, Create.
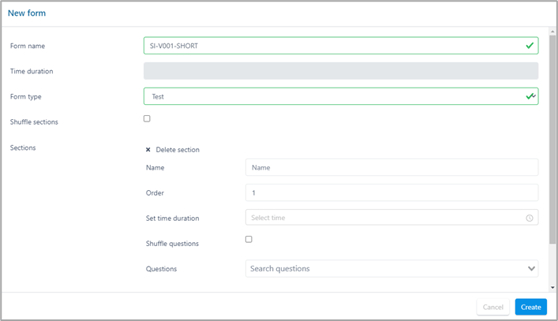
- Enter the Form name. Each form should have a unique form name. It is recommended that a consistent/standard naming convention be used for form names.
- Time duration is grayed out and will be dynamically adjusted based on the time assigned to each section.
- Form type can be Test or Survey.
- Mark Shuffle sections if there are multiple sections and they should be shuffled over the course of the administration.
- Individual Sections can be configured separately.
- Enter a unique Name for each section. For example, if creating a general education test, each section might be named for a subject.
- The Order will reflect where the section is placed within the form.
- Sections can have different times assigned, enter the appropriate time for a section in Set time duration.
- If the questions should be shuffled each time the form is administered, mark Shuffle questions.
- To select the Questions, start typing the question name in the search questions field.
- Continue adding questions until the section is complete.
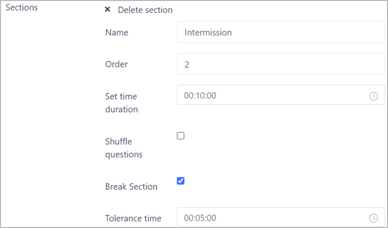
- Additional sections can be created by selecting + new section.
- Breaks - if a test has multiple sections, they can be divided by a Break.
Set the duration of the break and if so desired, a tolerance time or grace period for testers to return from break and begin testing. Testers will need to return within the tolerance time or they will be exited from their test.
- When all sections have been added, select Create.
- Once the form is created, there are several actions available.
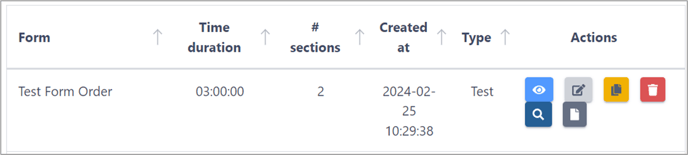
-
- Info– displays the form detail.
- Edit – details of a form can be edited up until the form is added to a Test.
- Copy – clicking the copy button will create a copy with the same name followed by “COPY”. Best practice is to provide a unique name for each form.
- Delete – Only forms not currently attached to a Test or an active administration can be deleted.
- Preview - displays the form content in the same manner as what the tester would see
- Preview detail - all the form content in one screen showing each individual question, responses and correct items indicated.
Tests/Surveys
Tests are the compilation of the forms to be administered to individual Learners.
- Select Assessments > Tests from the menu items.
- To create a new test, select Create.
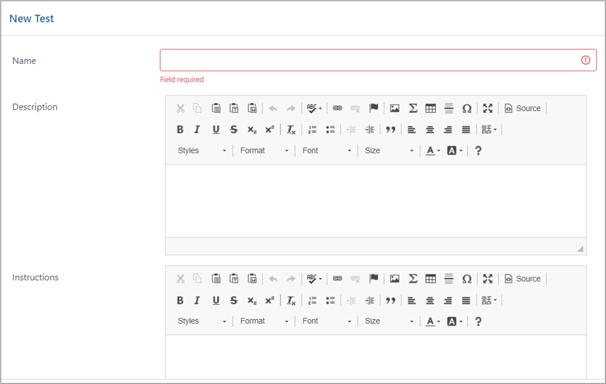
- Enter the Test name. Each test should have a unique test name. It is recommended that a consistent/standard naming convention be used for test names.
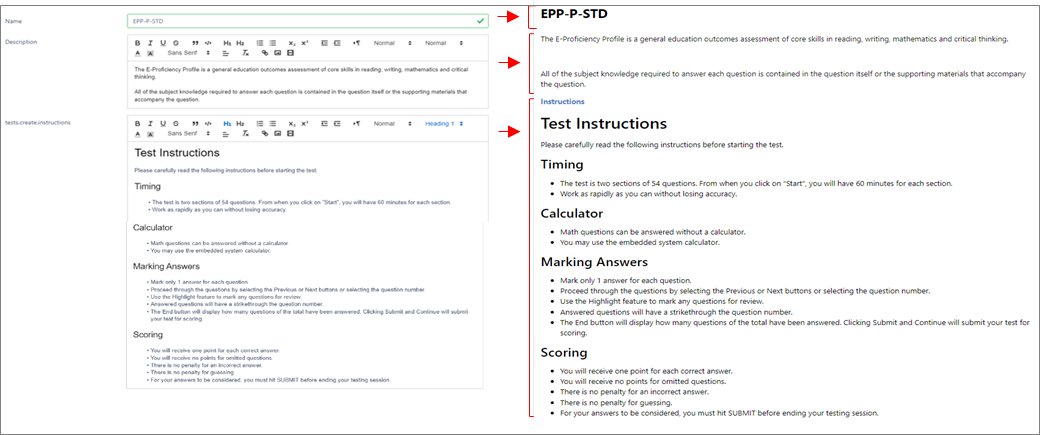
- The Description entered will display on the Learner’s screen prior to testing. Provide information about the test and any expectations of the Learner.
- The Instructions are also displayed on the Learner’s screen prior to testing. Include all testing instructions necessary for the Learner to have a successful test administration experience.
The following image shows on the left the information being entered for the administration and on the right how it is presented to the Learner.
- Duration is automatically calculated based on the forms selected.
- Form configuration is either form rotation, presenting 1 form each time but in specific order, or random selection which presents the form in a random order.

- Select Achievement - select the corresponding Achievement if linking a test to credential issuance.
- Select Forms –
- Any number of test or survey forms can be included in a Test. Survey forms will be administered at the start or end of the test depending on the order they appear in the list of forms. Surveys are not included as part of the form rotation.
- When all the test information has been added, select Create.
- Once the test is created, it can be viewed, edited, deleted, or previewed.

-
- Info– displays the test detail.
- Edit – details of a test; care should be taken when editing a test that is currently being administered to Learners.
- Delete - allows a test to be deleted prior to it being put into production.
- Preview - provides an overview of how the test will be presented to the tester.
Custom Products
After the Test is created, it is ready for turning it into an official product to use in testing.
- Select Assessments > Custom Products from the menu items.
- Select Create

- Enter the Name. Each product should have an unique name.
- The Description will provide additional information about the purpose of the test. Test takers will not see this information.
- Select the Test from the drop down menu
- When all the information has been added, select Create.
QTI Import
Test content can be imported through QTI Import. Import file requirements: QTI version 2.2 (backward compatible with 2.1), zipped, and less than 20MG.
- Select Assessments > Tests from the menu items.
- To import QTI, select QTI Import

- Select the file to be imported. When the file is ready to be imported a green dot will appear
 in the upper right corner. Select Import.
 - An Imported successfully message will display when the import has successfully completed.
- The import process will take the zip file content and populated the Tests, Forms, Questions, and Passages appropriately.
- Importing the same QTI file multiple times will create multiple instances of the same content with the same name and a version number (--x).
QTI Export
Test content can be exported through QTI Export. Files will be exported in the QTI version 2.2 format.
- Select Assessments > Tests/Surveys from the menu items.
- To export QTI, select QTI Export (green download button). File is automatically downloaded to your default download directory.

Sample Question Formats
Single Select

Multiple Select

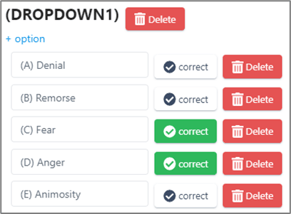
Dropdown

Open Response

Fill in the Blank

Conditional

Matching

Attach evidence
