How to earn a credential via the mobile app
Learn how to earn credentials in LifeJourney using the mobile app.
Your primary access point as a Learner will be via the LifeJourney Mobile app. Many of the same features of the Life Journey mobile application are available to learners via the Web application (https://life.territorium.com).
This article will discuss how you can use the LifeJourney application to earn digital credentials and claim the associated open badges to be stored in your digital wallet.
1. What is a digital credential
Educational institutions, training programs, or other learning providers can now issue verifiable credentials which let you can share your achievements with others in a secure and trustworthy manner. Instead of relying on paper certificates or transcripts, which can be forged or lost, verifiable credentials are stored digitally and can be easily accessed and shared online. The special thing about verifiable credentials is that they come with a digital signature, making them tamper-proof. This means that when you share your credential with someone, like a potential employer, they can verify its authenticity and ensure that it was indeed issued by a legitimate source.
There are two main credential types that you will use in the platform: An Open Badge or a Comprehensive Learner Record (CLR).
- Open Badges contain a visual representation of your achievement which often has the brand of the issuing organization and a name that conveys the badge’s meaning.
- A Comprehensive Learner Record or CLR is a digital record of all of your lifelong learning, whether it occurs through the attainment of degrees, certifications, or the completion of smaller events like courses, micro-credentials, or assessments of skill competencies.
Open Badges are typically associated with one achievement, like completing one course, reaching a skill competency, or completing one degree. Whereas a CLR, will be associated with a record of multiple achievements much like how a transcript will list multiple courses associated with completing a certificate or degree program.
Territorium supports Open Badges 3.0 and CLR 2.0 versions of the technical standards.
2. Manual assignments via Learning Outcomes
2.1 Find learning outcomes to complete
Learning outcomes represent the specific learning goals that need to be achieved to build knowledge, skills, and abilities that are the focus of the learning experience(s) to which they connect. A learning outcome will be associated to a specific achievement to complete such as an assessment, quiz, assignment, or other activity.
Visit the home page in the mobile app and select learning outcomes at the top of the screen.
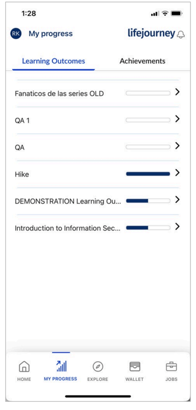
You will then see a list of learning outcomes assigned for you to complete as a result of your assignment to learning experiences. Learning outcomes can be nested, so once you click on one you might see some sub-tasks to complete.
Learning Outcomes whose progress bar have a color are those you have in progress because you have started to upload evidence. Those without a color need your attention and have a right-facing arrow.
To take action click on the learning outcome until you get to the Achievement detail screen.
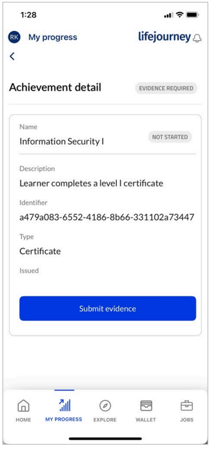
2.2 Submitting Evidence
Click through the learning outcome until you get to the Achievement details screen. Click Submit evidence. Complete the Title, Answer, and add the link, file or image. Multiple evidence files may be added.
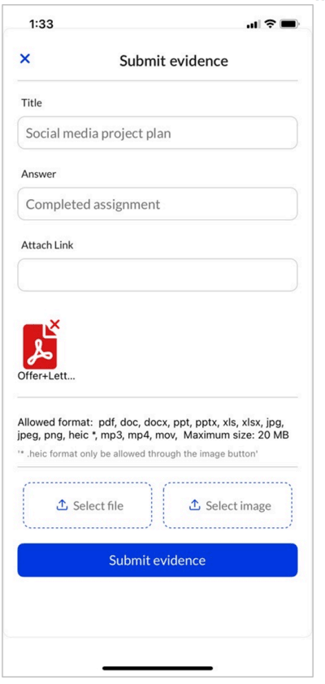
You can upload the following media:
pdf,.doc,.docx,.ppt,.pptx,.xls,.xlsx,.jpg,.png, .heic, .mp3,.mp4, .mov
There is a 20MB limit.
2.3 Modify evidence via the mobile app
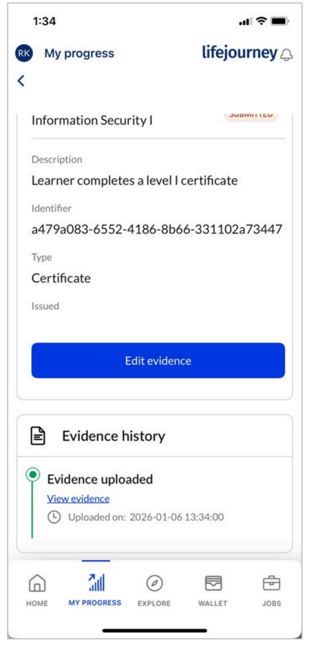
You can view or modify the evidence you have uploaded by clicking on the learning outcome again. Scroll down to view or edit the evidence. To remove the current evidence, click Edit evidence and then the X on the evidence file. ![]()
3. Claiming your credential
Once the administrator approves your submission, you will get a notification that a new credential is added to your wallet. You will receive an email asking you to login to “claim” it. You can complete this via the Web or mobile app.
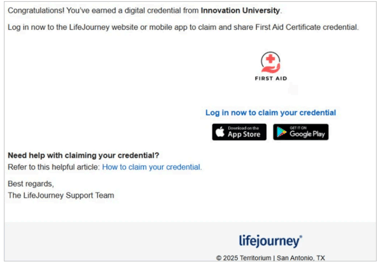
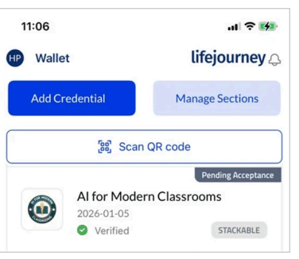
Upon your login to the mobile app, visit the Wallet section. You should see the pending badge at the top of your list of badges.
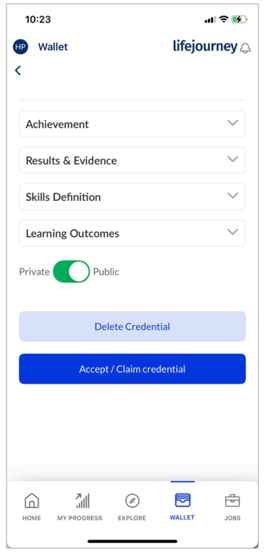
Click on the badge that is pending and scroll to the bottom of the credential. Then select Accept/Claim credential. After this is processed you will be able to use the sharing features.
Please make sure to claim your credentials as soon as possible. Without claiming the badges, you will have less information available to use the rest of the LifeJourney services. In addition, if your institution is issuing a CLR credential to you that relates to previous badges you have earned (such as a final credential for completing a micro-credential), it will not be able to do so until you have accepted and stored all the required previously issued credential.