 Admin Quick Start Guide
1. Getting Started in LifeJourney Portal
Territorium’s portal, LifeJourney, will be where you’ll administer the HEIghten assessments. Here, you can purchase inventory, create and manage cohorts via Learning Experiences, utilize AI proctoring, and run reports.
- To get started, log in to your LifeJourney account at https://life.territorium.com/#/login using the username and password that were included in your welcome email.

- Get acquainted with the layout. On this Home page, you will start with your user profile view. To enter administration, click on your institution logo on your home page or open the User Menu in the upper right-hand corner and select your institution under the Institutions section.
- Notice the new menu options in a ribbon down the left side of the page. Be sure to scroll down to the bottom of the list on the left to see all options. You can collapse any menu section by clicking on the section title.

2. Purchasing Assessment Units and Checking Inventory
To purchase tests via credit card, select Marketplace from the menu and then Purchase. To use a purchase order, please contact success@territorium.com with your desired test, proctoring option and quantity so a quote can be provided to you.
- Pricing is the same for Without Proctoring and Institutional Proctoring because neither option requires additional portal tools. The AI proctoring option is an additional fee (per exam) due to the data required to stream audio/video of testing evidences.
IF YOU DO NOT need proctoring, be sure to select the drop-down for the testing mode to “without Proctoring”, which will adjust the per unit cost accordingly
- To confirm purchase and ensure sufficient units are available to test your cohort, select Inventory under Marketplace. The My Products tab will display an accumulation of all your purchased items and the My orders tab gives you an ordering history with access to download receipts for individual orders.
- Purchased test units expire at the end of the month, 1-year post purchase. Expiration date, units expired, next expiration date and units expiring in 60 days, have been added to the My Products and My Orders tabs.

An administration refers to an individual instance where you will be testing a group of participants. We RECOMMEND a single Administration for each grouping of testers for ease of reporting. Also, be aware that each administration generates a related set of reports.
A cohort refers to the group of test-takers in an administration.
- Creating your Administration is next. Select the Assessments - Administrations from the menu items.
- Select Add Administration.

- Administration Name should provide the context for testing that cohort in that learning experience, for example, “2023-November – Psych – 1”
- Enter the maximum number of students to take this assessment in the Max tests allowed field. Leave this field at "0" if you do not have a limit of test takers.
- To select the Test – click the drop-down list and select from the test options based on your available inventory.
- Time zone is important to note to be able to provide the correct testing times for participants.
- Dates and Times will open the administration up to test takers for a certain window of time. Enter start/end dates by opening the calendar tool and clicking on the date, then scroll down to select the start/end time.
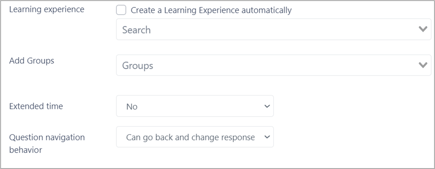
- Click on Create a Learning Experience automatically to have the system auto-generate the organizing bucket for the administration and data reports. If you do not create a Learning Experience, you will NOT be able to create an administration.
- Groups allow for add cohorts of students to a test administration. The Group must be created prior to adding it to an administration. We recommend having students self-register on LifeJourney as it removes the work of group management from the administrator.
- Extended Time allows you to offer more time for students to finish their test. You can choose between no extended time, 150% Extended time and 200% Double time. Once you have selected this option, an Extended Code is created for your administration along with a regular time Code. Simply provide students that need additional time the Extended Code for their exam and the remainder of your students the regular time Code.
- Question navigation behavior allows for testing flexibility and how testers can maneuver through an assessment.
- Can go back and change response (DEFAULT option)
- Can go back but can't change response
- Only can go back to unanswered question
- Can't go back to previous questions
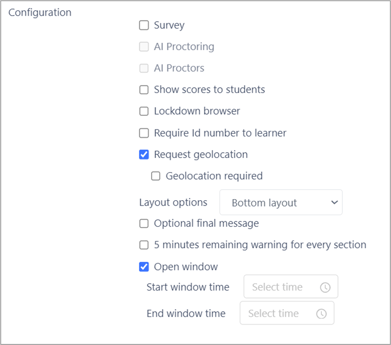
- Configuration Options are available for each administration:
-
- Survey gives you the option to include customized questions as part of the test administration. Selecting Survey will prompt for selection of a survey form previously created in LifeJourney. This Survey will be presented to the Learners at the beginning of the test. Instructions for creating a Survey are provided in the companion guide, “EdTest.ai – Authoring Tests & Surveys”. ONLY Survey (non-scored) options are available to assessment only customers - the full test creation subscription can be added to your LifeJourney account (please request a quote via success@territorium.com).
- AI Proctoring is only available to select if you purchased the “with Proctoring” mode of the assessment.
- AI Proctors will require you to create proctor roles and users to assign to your administration BEFORE you can add them to an administration. Allows individuals to monitor and resolve any ID validation or testing anomalies.
- Show scores to students provides test takers the opportunity to see their scores after completing and submitting their assessments by logging back in and visiting the "Score Report" icon on their test tile (administrators MUST enable this for students to see this icon after they have completed their exam and logged back in to LifeJourney).
- Lockdown browser forces test takers to download the Respondus lockdown browser. This browser prevents users from doing non-approved activities during the test, like screen captures and navigating away from the test window to other browser windows. As a default, all exams are launched in a locked down browser.
- Require ID number to learner means that when launching the test, the Learner will be prompted to enter their ID. If the Learner didn’t enter their ID when creating their account, their account will be updated with the ID entered when launching the test. If they did enter their ID upon account creation, the ID they enter when launching the test will be validated against their account ID.
-
- Request geolocation - can be used if you want Learners to turn on their geolocations for an extra layer of test security.
- Layout options allows the test question number sequence to be at the bottom of the tester's screen or the stop. Bottom is the standard layout.
- Optional final message is a WYSIWYG editor tool that provides a message to the test taker after they have completed the assessment.
- 5 minutes remaining warning for every section 5-second pop-up message indicating 5 minutes remain in the current test section.
- Open window allows you to create a window within the administration in which all learners must begin their test.
- Watermark adds a watermark to the background to help deter individuals trying to copy the content.
- Click Submit to finalize your selections.
- Administration Management. Now that you have a new administration, you can access the different options for management.

- Code – Select and copy the Code to provide in student communications for starting the assessment (See Item #4 below) or provide the Code Extended to those students needing extra time.
- Actions - several functions available to manage the administration.
-
- View Details – Overview of test administration setup.
- Edit Administration – Access to edit the administration name, dates, and configurations.
- Delete administration - permanently remove an administration that does not contain any started tests.
- View Students – provides an up-to-date view of the Learner status in the Administration and access to Learner-level reports as they complete the test.
- Reports - Download the Institutional reports and CSV files.
- AI Proctoring - Distribute the testers amongst proctors, view anomalies, resolve ID validation items.
- Accommodation Options - Set individual accommodations for testers.
-
Based on the type of assessment configuration you have selected; you will need instructions to give to students to access their assessments. The process begins with students using the Administration Code from above and creating their own username and password. Please select the appropriate set of directions for students based on your administration configuration below: